
I’m a fixer. When I hear about problems of any kind, my mind immediately goes to solutions.
When it comes to a slice, I’m no different.
A slice happens when the clubface is open relative to the path of your swing. The face does not match up with the direction the club is traveling. That’s why the ball peels weakly to the right, loses distance and makes you feel like you need to aim farther left just to keep it in play.
I won’t tell you every slice fix is the same. I also won’t tell you that one 30-minute range session will permanently fix your golf swing. But I can tell you this is worth a shot if you’re tired of learning about slices and ready to fix one.
You don’t need much for this. I’d bring a driver, a 7 iron, an alignment stick or extra club, a headcover (or towel) and some impact tape if you have it.
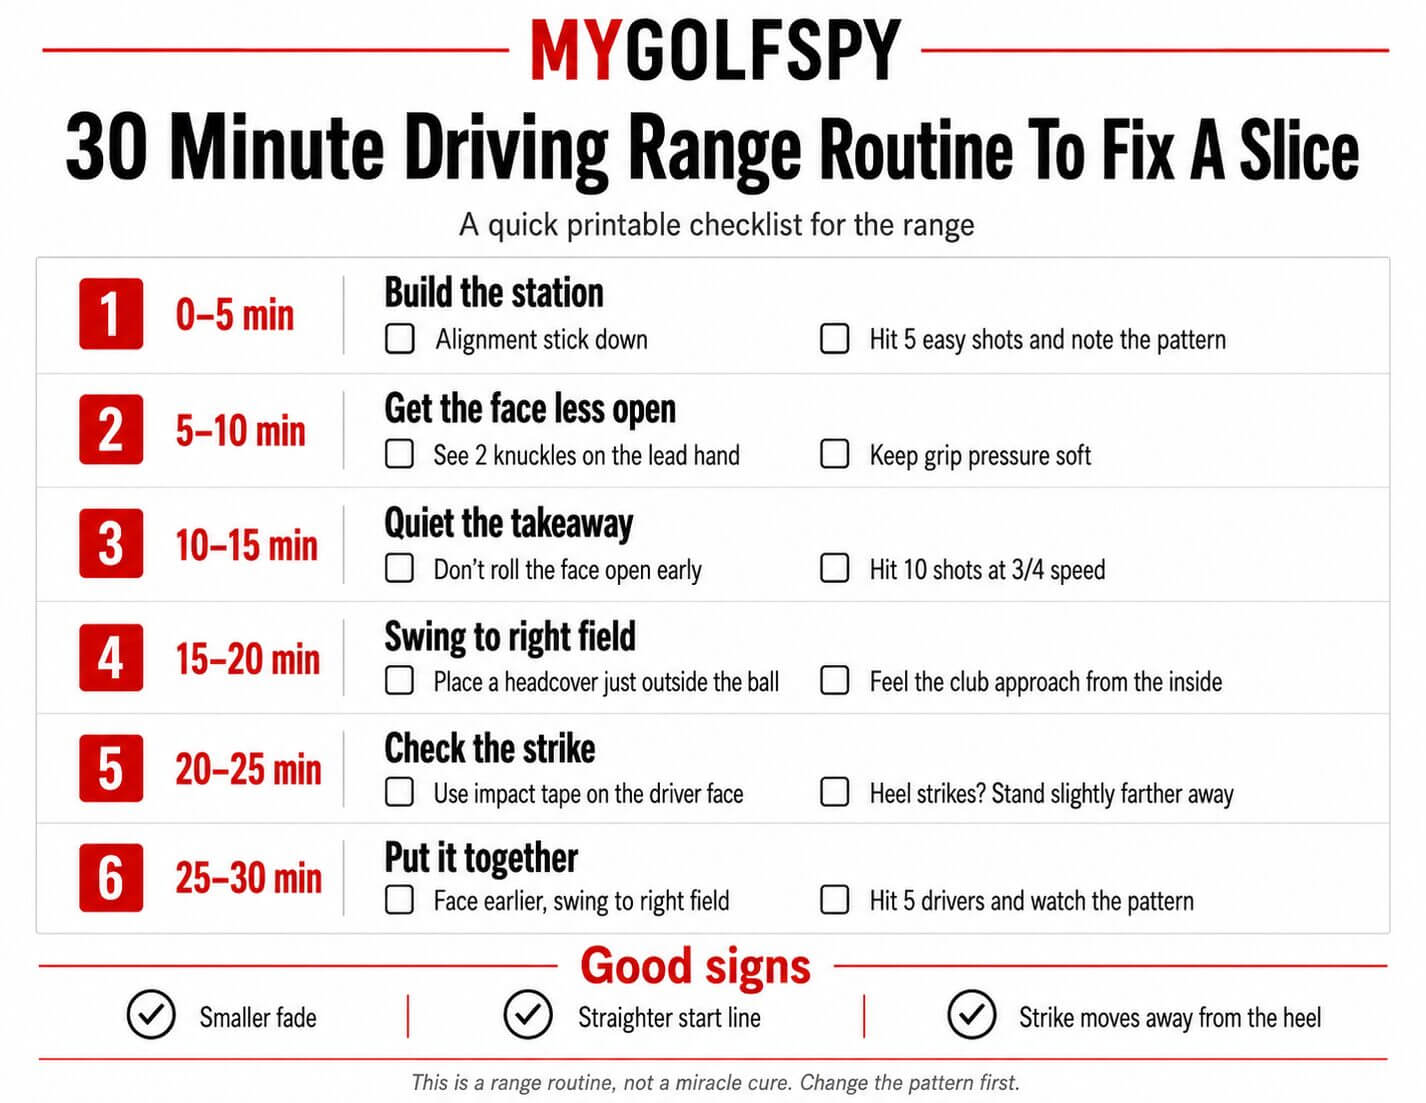
Minutes 0 To 5: Build the station
Before you start fixing anything, make sure your setup is not making your issues worse.
Put an alignment stick or extra club on the ground parallel to your target line. Most slicers are not aimed where they think they are aimed. They aim left, swing left and then wonder why the ball keeps moving farther right.
Start with five easy shots using a 7-iron. Don’t try to fix the slice yet. Just watch the pattern.
Pay attention to:
- Where the ball starts
- How much it curves
- Whether your finish feels low and left
- Whether the club feels like it is cutting across the ball
Minutes 5 To 10: Get the face less open
The slice is a face problem first.
If the clubface is open relative to your swing path, the ball is going to curve right. You can improve the path later but if the face stays open, the slice is still there.
Start by checking your grip. For many slicers, a slightly stronger grip helps the face return less open.
Look for this:
- You can see two knuckles on your lead hand
- Your trail hand sits more on the side of the grip
- Your grip pressure is soft enough that your hands can release
Slicers tend to get tight because they are trying to steer the ball away from trouble. The problem is that tension makes it harder to square the face.
Hit five half speed shots with a 7-iron or hybrid. Your only goal is to feel the face closing a little easier through impact. If the ball starts heading left, that’s not a bad sign.
Minutes 10 To 15: Stop rolling the face open
Now work on the takeaway.
A lot of slicers roll the clubface open early. Once that happens, the rest of the swing becomes a recovery mission. You don’t need to hold the face shut but you do need to stop fanning it open right away.
Make a few slow rehearsals where the clubface feels like it is looking slightly more toward the ground in the takeaway. Your lead wrist should feel more controlled, not cupped and wide open.
Then hit five balls at about three-quarter speed.
Minutes 15 To 20: Swing to right field
Now it’s time to give the club a better direction.
Put a headcover or towel just outside the golf ball and slightly behind it. You are creating a small wall that discourages the over-the-top move. If you swing too far from outside to in, you’ll hit the headcover or towel.
The swing thought here is to swing out towards right field.
Hit eight to 10 shots with a 7-iron.
Watch the feedback:
- If you hit the headcover, the path is still too far outside to in
- If the ball starts right and curves less, you are getting closer
- If the ball starts right and stays right, the face is still open
- If the ball pulls left, the face is improving but the path may still be left
Minutes 20 To 25: Find the strike
Now we move to the driver where your slice is probably the most prominent.
Some people use foot spray on the face. I think impact tape is much cleaner and I don’t love spraying my driver, but either one works.
Hit three drives and look at the strike pattern. Many slicers hit too much on the heel side of the face which can add slice spin and make a shot feel weak. Even if your grip and path are getting better, heel contact can keep the ball moving left to right.
If the mark is on the heel, stand just a touch farther from the ball or feel like you are trying to strike it slightly toward the toe.
Don’t overdo this. You are just trying to move the contact closer to the center and away from the heel. Hit three more drives and compare the strike pattern. If the strike moves closer to the center and the curve is smaller, you are moving in the right direction.
Minutes 25 To 30: Put it together
Now finish the session with a few final drives. Keep the station in place. Alignment stick down. Ball just inside the lead heel. Tee height high enough. Grip pressure soft.
Before each shot, make one slow practice swing with these three thoughts:
- Square the face earlier
- Swing to right field
- Finish through it
The “face earlier” part is important. A lot of slicers try to square the clubface after the ball is already gone.
Don’t judge the session by whether every ball is perfect. Watch for a different pattern.
Good signs include:
- The slice turns into a smaller fade
- The ball starts straighter
- Contact moves away from the heel
- You hit a ball that starts right and curves back
- You hit a pull instead of a weak slice
A pull is not perfect but it is different. Sometimes that’s where the fix starts.
Final thoughts
This session is not about rebuilding your entire golf swing. It’s about changing the pattern that keeps the slice alive and gaining some awareness about what your golf club is doing at impact.
You are trying to get the clubface less open, stop the face from rolling open in the takeaway, move the path a little more from the inside and get the strike away from the heel.
That’s a lot more useful than aiming left and hoping.
The post A 30-Minute Driving Range Routine To Fix A Slice appeared first on MyGolfSpy.
Article Link: https://mygolfspy.com/news-opinion/heres-a-30-minute-driving-range-routine-to-fix-a-slice/